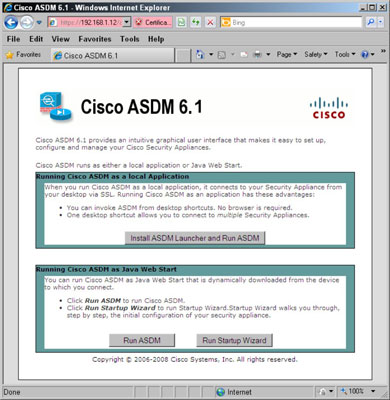
After you are connected to your Cisco Adaptive Security Appliance (ASA), you will have to decide whether to use the startup wizard or use a differemt configuration methods. The introduction page will appear and which allows you to make a decision. Because you need to have Java installed on your computer, you have three choices here:
- Install ASDM Launcher and Run Cisco Adaptive Security Device Manager (ASDM): Installs the ASDM on your computer. If this is the computer you will always use to perform your management, this method makes the most sense.
- Run ASDM: This option uses Java Web Start to launch the ASDM tool directly from the copy installed on the ASA. This is beneficial if you are not at your normal computer because you do not install any software.
- Run Startup Wizard: This option also uses Java Web Start to launch ASDM, with one exception; after the ASDM has launched, the Startup Wizard runs automatically.
To perform the network configuration of the ASA, the following process walks you through the Startup Wizard:
- Click the Run Startup Wizard button on the introduction page.You receive a warning related to the security settings on Java.
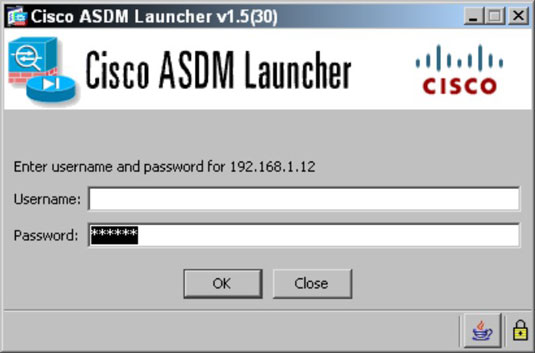
- If you are sure that you are connected to the correct device on the network and not some fake device trying to collect your credentials, dismiss the warning message.Because you expect this message from the ASDM, continue to the website. The Cisco ASDM Launcher dialog box appears.
- If you have an enable password, but no actual users, skip the Username field, fill in the enable password in the Password field, and click OK.If you have already created an administrative user, provide the username and password in the appropriate fields.
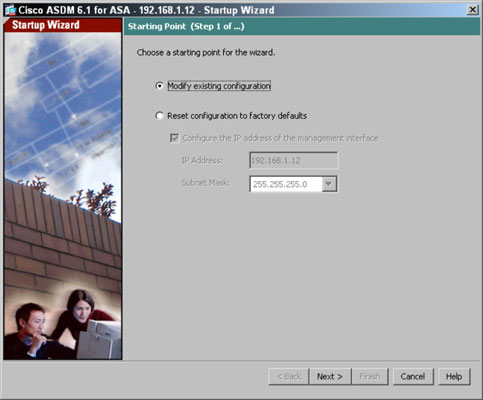
 The Starting Point page appears.
 - Select one of the following, based on whether you are setting up the ASA initially or whether you are using setup to change an existing ASA installation:
- Modify Existing Configuration: You can choose to modify the existing configuration.
- Reset Configuration to Factory Defaults: With the exception of the management interface, modify the default configuration. As it turns out, a lot of small networks out there require only simple changes to their configuration, and as such, re-running the Startup Wizard is the easiest way to make these changes.
- Click the Next button.The Basic Configuration page, appears with two optional items which you can choose to do.
- (Optional) Select from the following items:
- Configure the Device for Teleworker Usage: This option supports teleworkers or remote workers via a virtual private network (VPN). If you select this option, you are presented with an extra page of questions for the Easy VPN Remote Configuration near the end of the Startup Wizard.On this page, you can also tell the Startup Wizard the name of the firewall device, such as ASAFirewall1, and the domain name to which the device belongs, such as edtetz.net.
- Change Privileged Mode (Enable) Password: If you are not happy with your current enable password, change it here before you complete this step of the Startup Wizard.

- Click the Next button.
- Choose virtual local area networks (VLANs) for the Outside, Inside, and optionally, DMZ interfaces.Depending on the number of interfaces you are licensed for, you can configure up to three interfaces. The basic license for the ASA allows you to have only two interfaces. The Interface Selection page of the Startup Wizard appears.
- The Outside VLAN faces the Internet.
- The Inside VLAN faces your corporate network.
- The DMZ VLAN operates parallel to your corporate network. The Demilitarized Zone (DMZ)is an area where you can place servers, such as mail, web, or ftp servers, that the public at large — or at least people outside your network — need access to.
For each of these interfaces, you assign a VLAN to the segment or choose not to use the interface at all. By default, the Inside interface is configured for VLAN 1, which you can change if you want; however, because this is the default VLAN on your switches, you may not want to change it.For your Outside interface and DMZ interface, you can choose another VLAN or go with the ones chosen by default.Enabling the inside VLAN, outside VLAN, and DMZ VLAN interfaces does not actually associate any particular switch ports to those interfaces. The interfaces are virtual and need to be associated to physical interfaces on the switch. This means that any number of ports can be associated to any of these interfaces.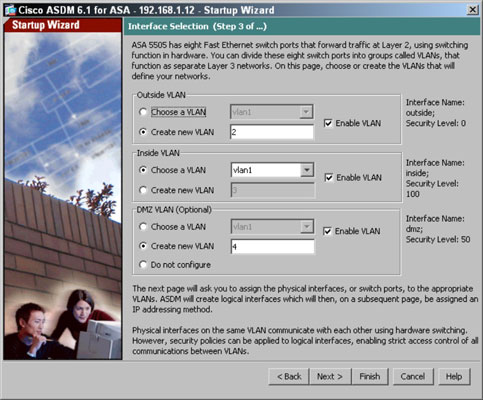
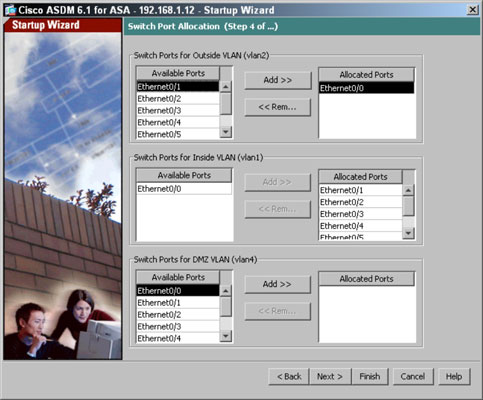
- Click the Next button.The Switch Port Allocation page appears.
- Assign the ASA switch ports to the three VLANs by selecting the port in the Available Ports or Allocated Ports panes and clicking the Add or Remove buttons.Initially, all your ports are associated with the inside VLAN. In most cases, associate the lowest interface, or Ethernet 0/0 of an ASA 5505, with the outside VLAN because you will likely want to use the additional ports on the inside of your network.Also, on the ASA 5505, the last two ports supply Power over Ethernet (POE) to power up devices, such as phones or access points (APs), which is yet another reason you want the upper ports to be associated with the inside network.As you choose a switch port and associate it with a VLAN or interface, you are prompted with a message telling you that it may be removed from an existing VLAN. Because all ports start out associated with the Inside interface, you see this message for all your port reassignments.
- Click the Next button.The Interface IP Address Configuration page appears.
- Assign IP configuration for each of your IP addresses.For your outside address, you can manually assign an address, which is not uncommon for business Internet connections. If your Internet connection supports either Dynamic Host Configuration Protocol (DHCP) or Point-to-Point Protocol over Ethernet (PPPOE), select the appropriate option.If you use DHCP, tell your ASA to use the default gateway it receives from DHCP as the system-wide default gateway for this device. If you choose not to use the system-wide default gateway option, you need to configure a manual route through ASDM or the route outside 0 0
at the command-line interface (CLI). 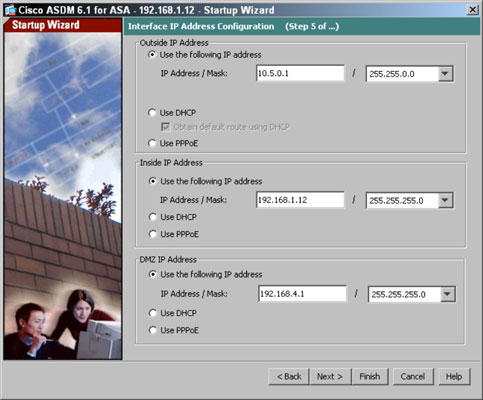
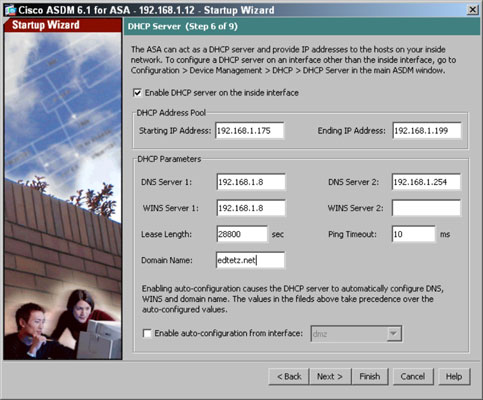
- Click the Next button.The DHCP Server page appears. For small businesses or regional offices, the ASA may represent the only real device on the network other than printers and computers. You may have these locations set up without any local servers onsite.
- (Optional) Select the Enable DHCP Server on the Inside Interface check box to have the ASA act as a DHCP server for this network segment.
- (Optional) Select the Enable Auto-Configuration from Interface check box so that you can copy most of these settings from an existing interface.Enabling the Auto-Configuration check box is very useful for Domain Name System (DNS) and Windows Internet Name Service (WINS) server addresses that are constantly being used on all network segments and may all be the same for the organization.
- Configure or change any of the missing information in the following:
- Starting IP Address: The first address to be handed out in the DHCP range.
- Ending IP Address: The last address to be handed out in the DHCP range.
- DNS servers 1 and 2: The DNS servers that are handed out to DHCP clients.
- WINS servers 1 and 2: The WINS servers that are handed out to DHCP clients.
- Lease Length: The lease length determines when DHCP clients are required to renew their leases on the DHCP supplied addresses.
- Ping Timeout: The Ping Timeout setting is used by the DHCP server because it pings each address that it is ready to give, prior to assigning the address, to verify that the address is not in use. This reduces the chance of duplicate IP addresses being created on the network.
- Domain Name: The domain name of the DHCP client belongs to.
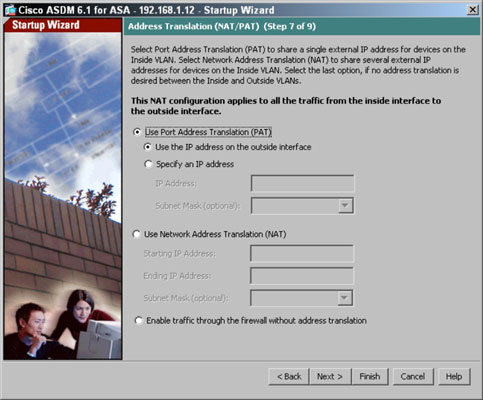
- Click the Next button.The Address Translation (NAT/PAT) page appears.
- Set up Network Address Translation or Port Address Translation.Choose from the available address translation methods:
- Use Port Address Translation (PAT): Most small offices, which use only one public IP address on their Internet connection, use PAT on their connection. PAT can use a specific address or the main address from their outside VLAN interfaces. PAT allows an entire office to share (or translate to) a single external IP address for Internet access.
- Use Network Address Translation (NAT): Selecting NAT puts one-to-one mapping (or translation) between internal and external IP addresses, so you can specify a range of addresses to use on the outside VLAN interface.If you use ASA internally on your network (for example, to protect a server subnet), you may want to select the Enable Traffic through the Firewall Without Address Translation radio button if you use public addresses on your internal network (not likely) or if you use the ASA as firewall on the interior of your network.
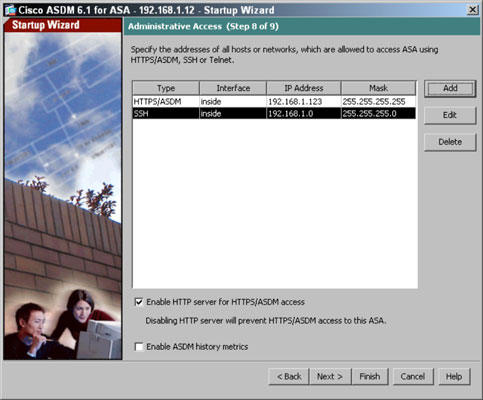
- Click the Next button.The Administrative Access page appears.
- Set what systems on your network can connect to your ASA to perform management or configuration changes.Use the following process to add new management interfaces. If you want to use ASDM, you need to select the Enable HTTP Server for HTTPS/ASDM Access check box, whereas the Enable ASDM History Metrics check box saves usage data regarding accessing the ASDM interface.In the command line setup, you only have the option to ASDM connections to be made from a single computer. This page allows you to specify additional systems that can perform management of your ASA and the type of connection they make to perform that configuration.
 If you add a new management option, the Add Administrative Access Entry dialog box appears. Select your desired options to create the new Administrative Access entry:
- Choose HTTP (ASDM), SSH, or Telnet from the Access Type drop-down list.
- Choose Inside from the Interface Name drop-down list.Inside is typically the most secure interface option, but in some cases, such as if you need to be able to conduct remote administration over the Outside interface, you should be very restrictive in the address from which the administration is performed.
- Specify either a specific address from which administration is performed in the IP Address text box or give a network range defined by either an IP address or a Network ID from the Subnet Mask drop-down list.Remember, the more restrictive you can be with this configuration, the more secure your ASA is.
- Click OK.You return to the Administrative Access page.
If you allow your firewall to be administered from the outside interface, you leave yourself open to potentially being compromised by someone you do not know.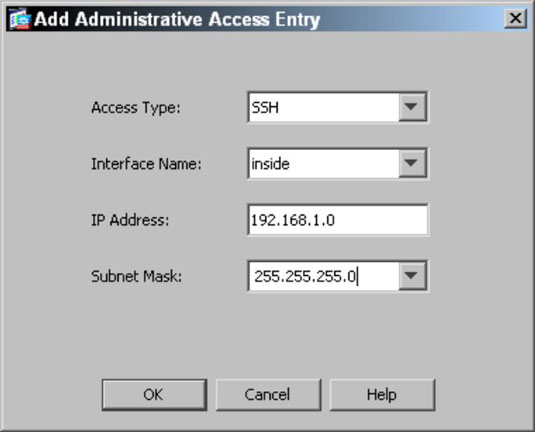
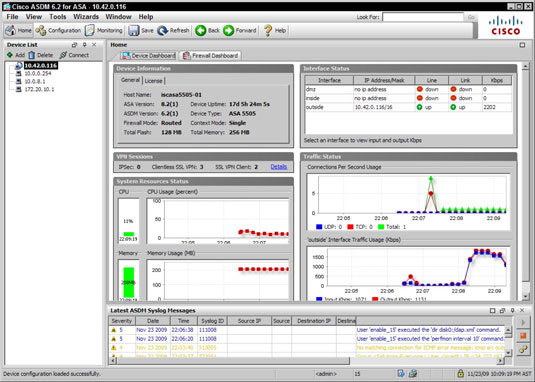
- Click the Next button.The summary page of the configuration Startup Wizard appears, providing a summary of the configuration that you have applied to the system. All these configuration changes are written into the running configuration on the ASA. After the configuration changes are made, you see the standard ASA ASDM management screen. From this interface you can
- Perform any other configuration changes.
- Relaunch the Startup Wizard or other wizards.
- Perform basic monitoring of the ASA via the home page.
- Perform more detailed monitoring of the ASA and connections that it hosts through the Monitoring pages.
- Run additional management and troubleshooting tools.
- Save the current configuration to flash memory.
Nessun commento:
Posta un commento