Introduction
The Cisco Secure Services Client (SSC) is client software that provides 802.1X (Layer 2) and device authentication for access to both wired and wireless networks. SSC manages user and device identity and the network access protocols required for secure access. It works intelligently to make it simple for employees and guests to connect to an enterprise wired or wireless network.
SSC supports these main features:
• Wired (802.3) and wireless (802.11) network adapters
•Integrated VPN support
•Authentication using Windows machine credentials
•Single sign-on user authentication using Windows logon credentials
•Simplified and easy-to-use 802.1X configuration
•EAP methods:
–EAP-FAST, EAP-PEAP, EAP-TTLS, EAP-TLS, and
Wired (802.3) and wireless (802.11) network adapters
•Integrated VPN support
•Authentication using Windows machine credentials
•Single sign-on user authentication using Windows logon credentials
•Simplified and easy-to-use 802.1X configuration
•EAP methods:
–EAP-FAST, EAP-PEAP, EAP-TTLS, EAP-TLS, and
LEAP (EAP-MD5, EAP-GTC and EAP-MSCHAPv2 for 802.3 wired only).
•Inner EAP methods:
–PEAP—EAP-GTC. EAP-TLS, and EAP-MSCHAPv2
–EAP-FAST—EAP-GTC. EAP-TLS, and EAP-MSCHAPv2
–EAP-TTLS—EAP-MD5 and EAP-MSCHAPv2
(also legacy protocols—PAP, CHAP, MSCHAP, and MSCHAPv2)
•Encryption modes:
–Static WEP (Open or Shared), dynamic WEP (generated with 802.1X), TKIP and AES
•Key establishment protocols:
–WPA, WPA2/802.11i and CCKM (selectively, depending on the 802.11 NIC adapter)
•Smartcard-provided credentials
•Cisco Trust Agent (CTA) processing when CTA is also installed
LEAP (EAP-MD5, EAP-GTC and EAP-MSCHAPv2 for 802.3 wired only).
(also legacy protocols—PAP, CHAP, MSCHAP, and MSCHAPv2)
Supported Operating Systems
The supported 32-bit operating systems are:
•Windows XP Professional (SP2)
•Windows 2000 (SP4)
•Windows 2003 Server Enterprise Edition (SP2)
GUI Operation
The management utility GUI guides the administrator through a series of windows and menu options to specify and configure the wired and wireless network security profiles.
Points to remember when using the management utility GUI:
•If an entry has a ? next to it, you can click the ? to obtain context-sensitive help.
•The window that appears when you click Next is determined by the choices you made on the current window.
To activate the SSC management utility GUI, double-click sscManagementUtility.exe. The welcome window appears (see Figure 2-1).
Figure 2-1 Cisco SSC Management Utility Welcome Window
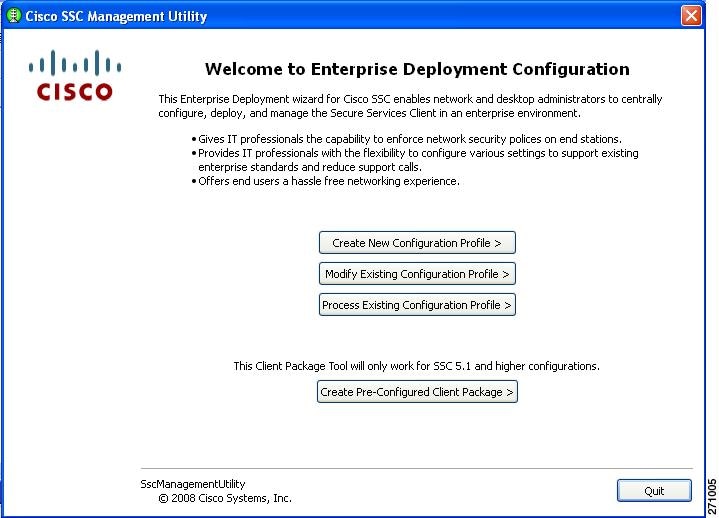
There are four choices on this window:
•Create New Configuration Profile—Used to create a new deployment profile. The management utility guides the system administrator through the process of specifying client policies and security authentication policies for single or multiple networks. The management utility validates the configuration file against the configuration schema and the business rules.
•Modify Existing Configuration Profile—Used to revise the policy settings of an already created (unprocessed or processed) configuration file. Processed profiles are valid, signed, encrypted (shared keys and passwords are encrypted), and contain embedded certificate and Proxy Auto-Configuration (PAC) files.
•Process Existing Configuration Profile—Used to process and validate an existing configuration profile (processed or unprocessed) against the configuration schema and business rules. The processing involves these operations:
–Verifying the validity of the created file
–Embedding any referenced certificate or PAC files
–Encrypting any passwords or shared keys
–Signing the final configuration file, so that end users cannot tamper with the administrator-deployed configuration file.
•Create Pre-Configured Client Package—The management utility combines the client source package file with the processed and signed configuration file to produce the client destination package file. The client destination package file is used to configure the user's PC with SSC and the defined profiles.

Note For SSC 5.0, the sscPackageGen utility must be used to generate the destination package file.
Creating a New Configuration File
To create a new configuration file, click Create New Configuration Profile and the window shown in Figure 2-2 appears.
Figure 2-2 Select Cisco SCS Version Window
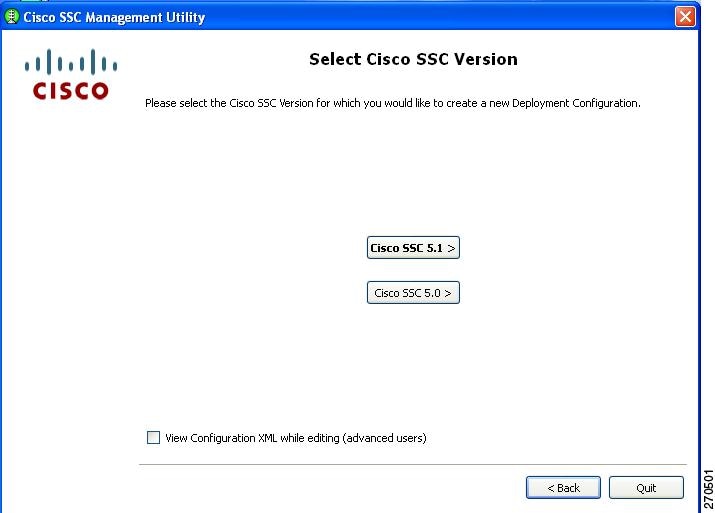
The SSC management utility enables you to create a configuration file for SSC 5.1 or 5.0.
When you click Cisco SSC 5.1, the Client Policy window appears (Figure 2-3).
Configuring Client Policy
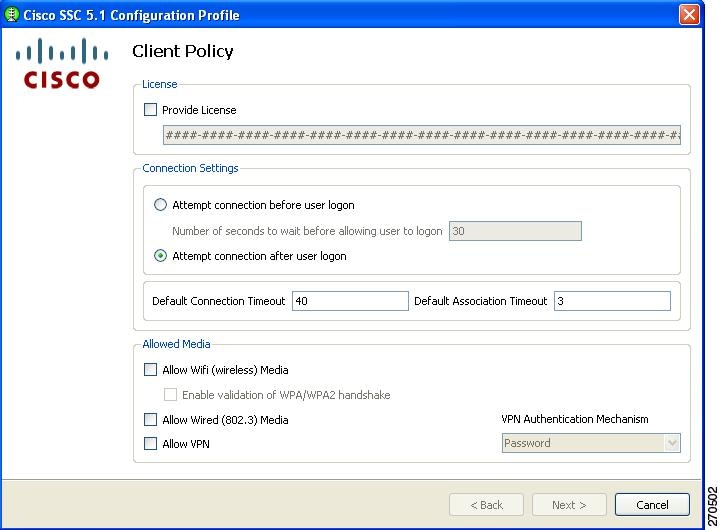
The Client Policy window enables you to configure the client policy options (Figure 2-3).
Figure 2-3 Client Policy Window
Note SSC releases 5.0 and later do not allow end users to enter license numbers using the SSC GUI. It is the responsibility of the network administrator to enter a valid license in the destination package using the SSC management utility so that all end users have the appropriate license.
There are three sections on this window:
•License section—allows you to specify a new unlimited SSC license key that you purchased from Cisco.
Note The SSC software downloaded from the Cisco.com download center supports a limited 90-day trial license.
•Connection Settings section—allows you to define whether 802.1X authentication must be attempted after user logon or before Windows domain authentication (pre-logon). If you choose pre-logon, you can also specify the maximum (worst case) number of seconds to wait before allowing the user to logon (default 30 seconds). If a network connection cannot be established within this time, the Windows logon process continues with user logon.
•Allowed Media section—enables the types of media controlled by the SSC client.
Note SSC releases 5.0 and later are single-homed allowing only one network connection to be operating at a time. Also, wired connections have higher priority than wireless connections.
If you enable VPN for a wireless connection, you can specify the authentication mechanism VPN will use:
•Soft token authentication—Prompts for username and password for the soft token account. SSC automatically obtains the soft token from the Secure Computing SofToken-II program and passes the soft token to the IPSec VPN client.
•Password authentication—Prompts for the VPN password. SSC automatically activates the IPSec VPN client and passes the password.
•Certificate authentication—No prompt is required. SSC automatically activates the IPSec VPN client, and the VPN server obtains the certificate.
When you complete your selections and click Next, the Authentication Policy window appears (Figure 2-4).
Configuring Authentication Policy
This window allows you to define global association and authentication network policies. Global policies apply to all networks that you, the administrator, or the user can create.
Figure 2-4 Authentication Policy Window
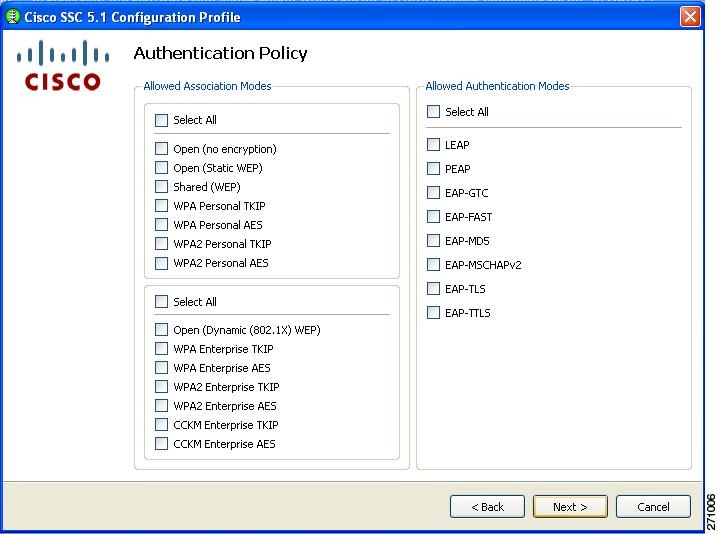
When you complete your selections and click Next, the Networks window appears (Figure 2-5).
Configuring Networks
The Networks window allows you to configure networks that are pre-defined for your enterprise user. You can either configure networks that are available to all groups or create groups with specific networks. For additional information on groups, see the "Groups in SSC" section.
Figure 2-5 Networks Window
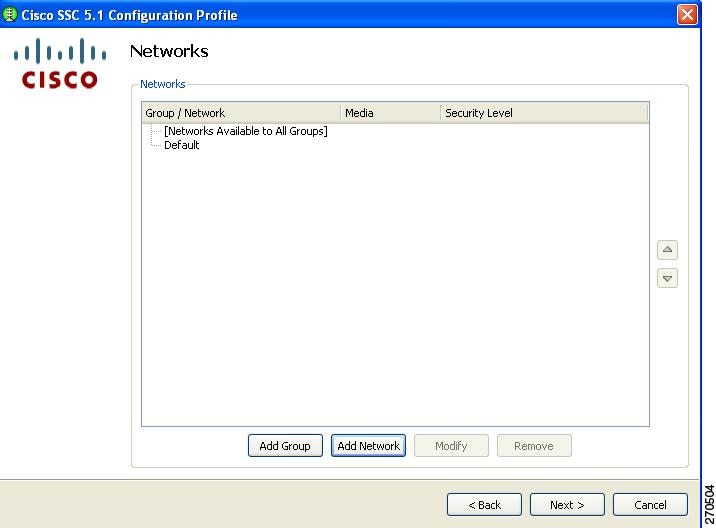
When you click Add Group, the User Groups window appears (Figure 2-6).
Figure 2-6 User Groups Window
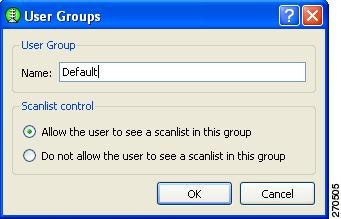
The Scanlist control section enables you to control whether users can see the scanlist when this group is active. It may be necessary to restrict viewing of the scanlist; for example, in order to prevent users from accidentally connecting to nearby devices.
Note This is a per-group setting. For groups created by the end user using the SSC GUI, the scanlist control is set to Allow the user to see a scanlist in this group.
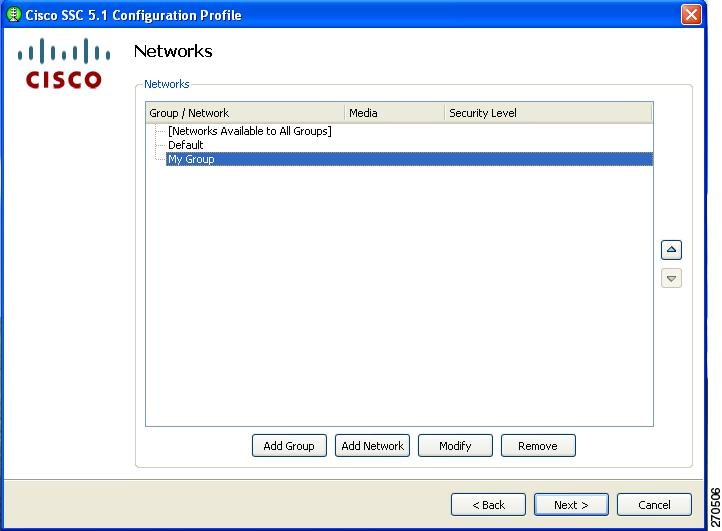
Click OK. The Networks window reappears with the new group just created visible (My Group in Figure 2-7).
Figure 2-7 Networks Window with New Group Visible
Network groups contain single or multiple network profile descriptions. A network profile defines the specific properties and operational behavior of a single network. The profile includes the following characteristics:
•The user-friendly name of the network.
•Network access media (wired, Wi-Fi) and adapter details used for the network connection.
•Definition of the security class (open, shared key, authenticating) of the network.
•Definition of the connection context (machine only, user only, machine and user) for the network.
•Wi-Fi association and encryption method (Wi-Fi network).
•Authentication methods supported and properties (authenticating network).
•Static keys, if applicable (non-authenticating network).
•Definition of types and source of credentials (authenticating network).
•Definition of trusted servers (authenticating network) and support for deploying Certificate Authority (CA) certificates and manual provisioning of EAP-FAST Protected Access Credentials (PACs).
Networks defined as part of the distribution package are locked; therefore, the end user is not able to edit the configuration settings or delete the profiles.
On the Networks window (Figure 2-7), you can add a network to a newly created group, such as My Group, by highlighting it and clicking Add Network. The Network Media window appears (Figure 2-8).
Figure 2-8 Network Media Window
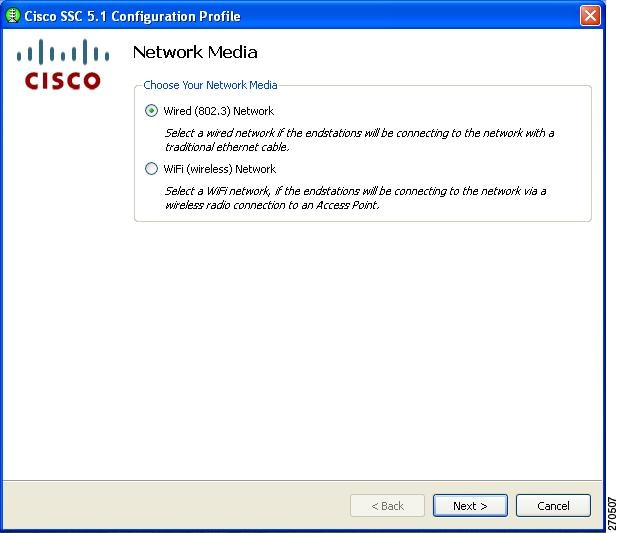
This window enables you to choose a wired or a wireless network.
If you choose Wired (803.3) Network and then click Next, the Wired Network Setting window appears (Figure 2-9).
If you choose Wifi (wireless) Network and then click Next, the WiFi Network Setting window appears (Figure 2-11).
When you have finished adding all your groups and networks, click the Next button and Figure 2-24 appears (see the "Validating the Configuration File" section).
Configuring Wired Network Settings
The Wired Network Settings window enables you to create an open (non-secure) network or an 802.1X authentication wired network (Figure 2-9).
Figure 2-9 Wired Network Settings Window
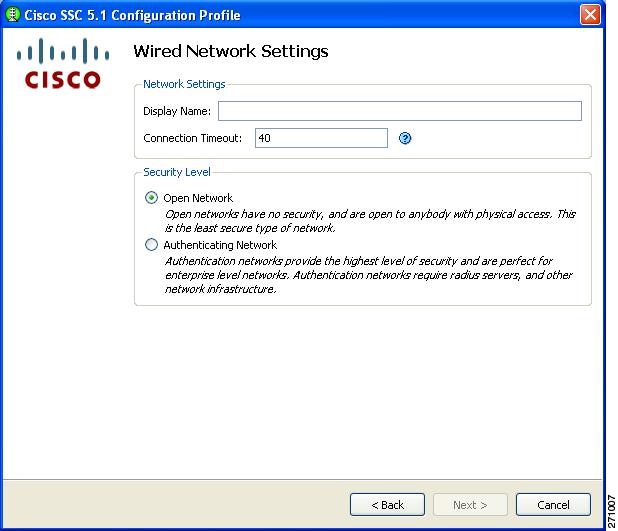
In the Display Name field, you can enter the name that is displayed for this wired network.
The Connection Timeout value is the length of time that SSC waits for a network connection to be established before it tries another network.
Note Some smartcard authentication systems require almost 60 seconds to complete an authentication. When using a smartcard, you might need to increase the Connection Timeout value.
In the Security Level area, choose the desired network type:
•Open Network—This setting is recommended for guest access on the wired network.
•Authenticating Network—This setting is recommended for secure enterprise wired networks.
When you choose Open Network and click Next, the 802.1X Connection Setting window appears (Figure 2-12).
When you choose Authenticating Network and click Next, the 802.1X Connection Settings window appears (Figure 2-10). This window enables you to enter your 802.1X timer values. The default values should work for most wired networks; however, you have the option to configure the settings to suit your environment.
Figure 2-10 Connection Settings Window for a Wired Network
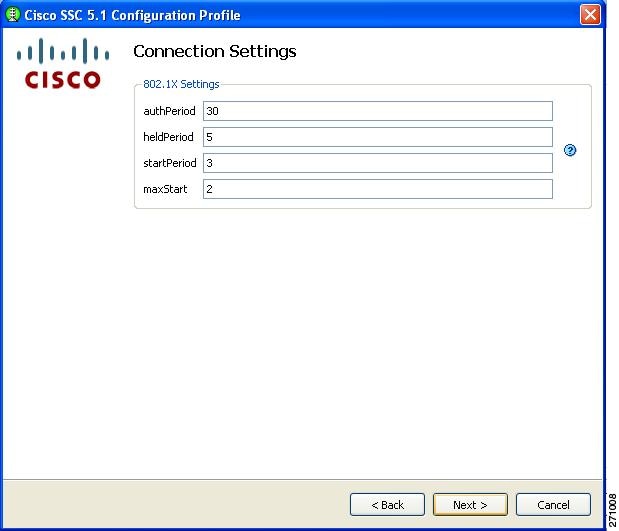
When complete and you can click Next, the Network Connection Type window appears (Figure 2-13).
Configuring WiFi Network Settings
The WiFi Network Settings window enables you to create an open (non-secure) network, a shared key network, or an 802.1X authentication wireless network (Figure 2-11).
Figure 2-11 WiFi Network Settings Window
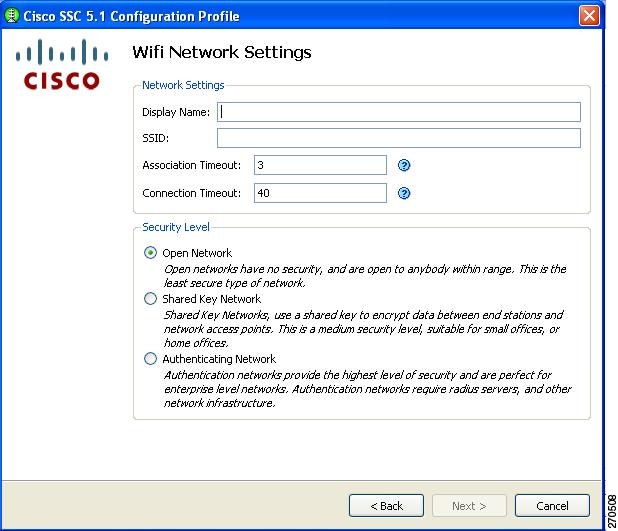
In the Display Name field, you can enter the name that is displayed for this wireless network.
In the SSID field, you should enter the SSID (or network name) for this wireless network.
The Association Timeout value is the length of time that the SSC waits for association to the SSID before it tries another network.
The Connection Timeout value is the length of time that the SSC waits for a network connection to be established, before it tries another network.
Note Some smartcard authentication systems require almost 60 seconds to complete an authentication. When using a smartcard, you might need to increase the Connection Timeout value.
In the Security Level area, choose the desired network type:
•Open Network—This setting is recommended for guest access wireless networks.
•Shared Key Network—This setting is not recommended for enterprise wireless networks.
•Authenticating Network—This setting is recommended for secure enterprise wireless networks.
When you complete your selections and click Next, the CCX Settings window appears.
Note The CCX settings apply only in a Windows Vista environment.
When using Windows XP or Windows 2000, ignore the CCX settings window and click Next. The 802.1X Connection Settings window appears (Figure 2-12).
This window enables you to enter your 802.1X timer values. The default values should work for most networks; however, you may set it to suit your environment.
Figure 2-12 802.1X Connection Settings Window for a Wireless Network
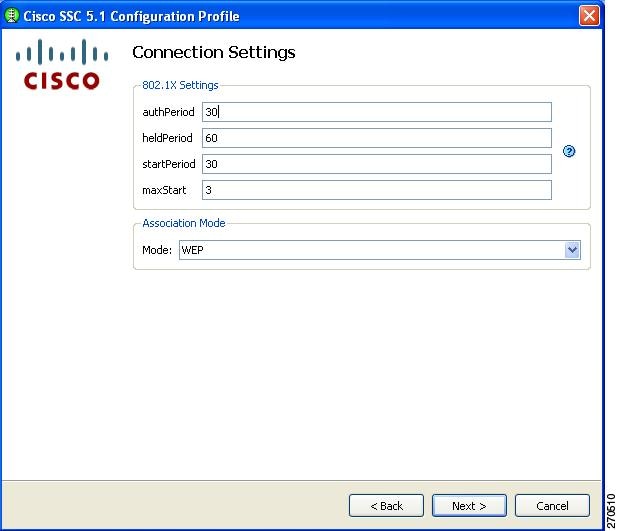
In the Association Mode field, click the drop-down arrow to select the association mode for this network:
•WEP
•WPA Enterprise (TKIP)
•WPA Enterprise (AES)
•WPA2 Enterprise (TKIP)
•WPA2 Enterprise (AES)
•CCKM (TKIP)
•CCKM (AES)
Note The chosen association mode must be enabled from the Authentication Policy window (see the "Configuring Authentication Policy" section).
When finished, click Next and the Network Connection Type window appears (Figure 2-13).
Configuring the Network Connection Type
Figure 2-13 Network Connection Type Window
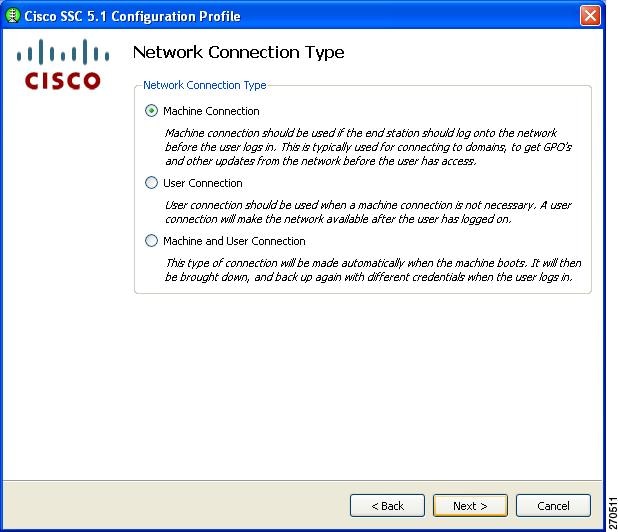
This window enables you to choose the type of network connection. SSC defaults to Machine Connection. The User Connection option defines the connection as a user connection type. User connections are attempted after the user has logged onto the PC.
A machine and user network contains a machine part and a user part. The SSID is the same for the two parts, but the credential type for machine connection can be different from the credential type for user connection.
Note For an open network, the Machine and User Connection option is not available.
When finished, click Next and the Machine Authentication (EAP) Method window appears (Figure 2-14).
Configuring EAP Authentication
The Machine Authentication (EAP) Method and the User Authentication (EAP) Method windows enable you to choose the authentication method for the machine and the user, respectively. Both windows contain the same authentication method options.
Figure 2-14 lists the EAP methods for a wireless network connection.
Figure 2-14 Machine Authentication (EAP) Method Window for a Wireless Network Connection
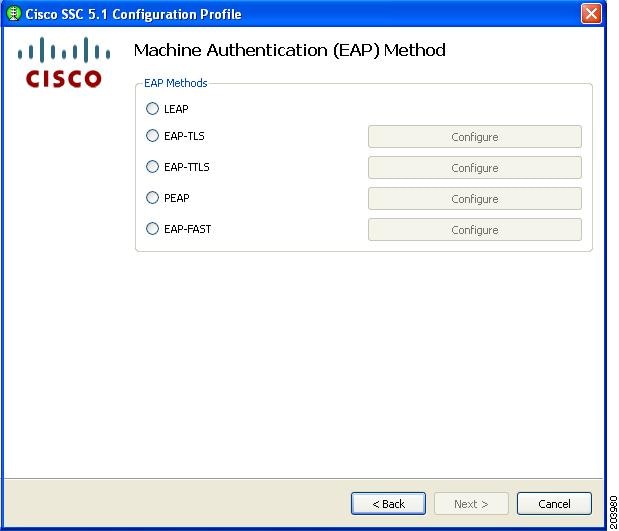
Figure 2-15 lists the EAP methods for a wired network connection.
Figure 2-15 Machine Authentication Method Window for a Wired Network Connection
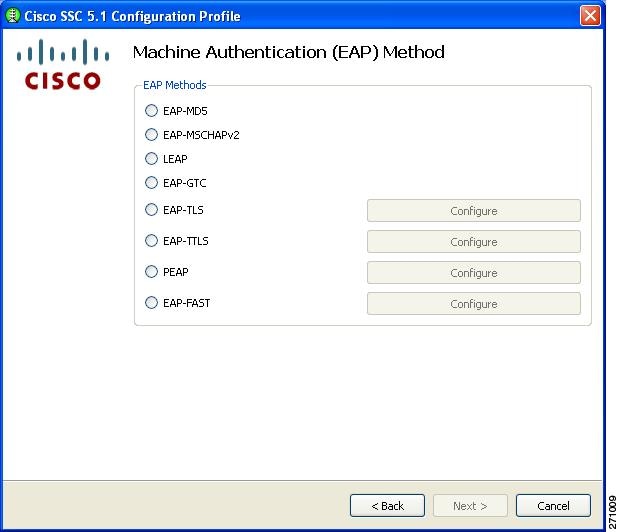
Note The chosen authentication mode must be enabled from the Authentication Policy window (see the "Configuring Authentication Policy" section).
If you choose any of the EAP options with a configure button, you must click the corresponding Configure button to configure the EAP method:
•EAP TLS—See the "Configuring EAP TLS" section.
•EAP TTLS—See the "Configuring EAP TTLS" section.
•PEAP—See the "Configuring PEAP Options" section.
•EAP Fast—See the "Configuring EAP Fast Settings" section.
If you choose the Validate Server Identity option on the EAP TLS, EAP TTLS, PEAP, or EAP Fast settings window, the window in Figure 2-20 appears after you click Next (see the "Configuring Trusted Server Validation Rules" section).
If you do not choose the Validate Server Identity option, Figure 2-22 appears when you click Next (see the "Configuring Trusted Certificate Authority" section).
Configuring EAP TLS
The EAP TLS Settings window contains two options (Figure 2-16):
•Validate Server Certificate—enables server certificate validation.
•Enable Fast Reconnect—enables session resumption.
Note The Disable when using a Smart Card option is not available for machine authentication.
Figure 2-16 EAP-TLS Settings Window
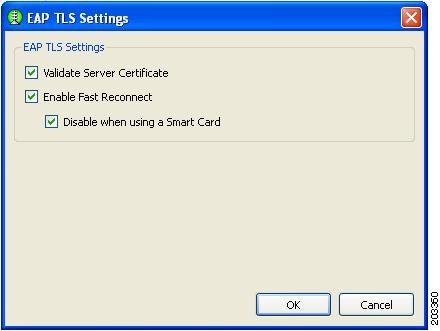
When you click OK, the Machine or User Authentication (EAP) Method window reappears (see the "Configuring EAP Authentication" section).
Configuring EAP TTLS
The EAP TTLS Settings window enables you to configure EAP TTLS settings (Figure 2-17).
Figure 2-17 EAP TTLS Settings Window
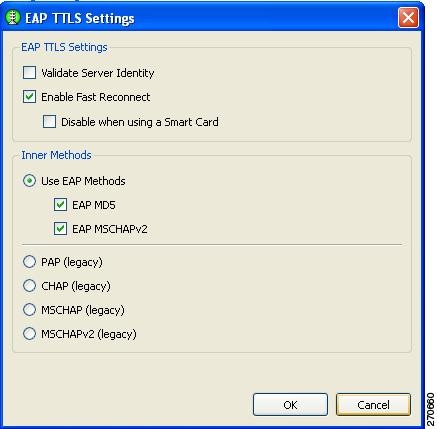
The EAP TTLS Settings window contains two sections:
•EAP TTLS Settings
–Validate Server Identity—enables server certificate validation.
–Enable Fast Reconnect—enables session resumption.
Note The Disable when using a Smart Card option is not available on machine authentication EAP method setting windows.
•Inner Methods—Specifies the EAP methods.
Note Prior to choosing the EAP MD5 or EAP MSCHAPv2, the option needs to be enabled on the Authentication Policy window (see the "Configuring Authentication Policy" section).
When you are finished, click OK. The Machine or User Authentication (EAP) Method window reappears (see the "Configuring EAP Authentication" section).
Configuring PEAP Options
The PEAP Settings window enables you to configure PEAP settings (Figure 2-18).
Figure 2-18 PEAP Setting Window
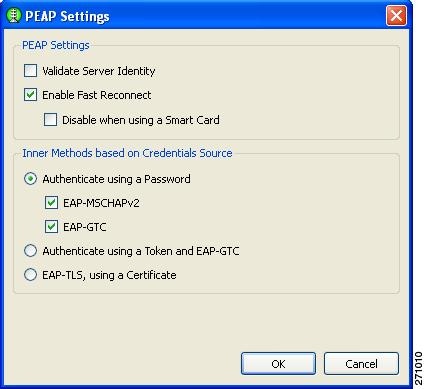
There are two sections on this window:
•PEAP settings
–Validate Server Identity—enables server certificate validation.
–Enable Fast Reconnect—enables session resumption.
Note The Disable when using a Smart Card and the Authenticate using a Token and EAP GTC options are not available for machine authentication.
•Inner methods based on Credentials Source—enables you to choose to authenticate using a password or a certificate.
Note Prior to choosing EAP MSCHAPv2 or EAP GTC, the option needs to be enabled on the Authentication Policy window (see the "Configuring Authentication Policy" section).
When you complete your selections and click OK, the Machine or User Authentication Method window reappears (see the "Configuring EAP Authentication" section).
Configuring EAP Fast Settings
The EAP FAST Settings window enables you to configure the EAP Fast settings (Figure 2-19):
Figure 2-19 EAP FAST Settings Window
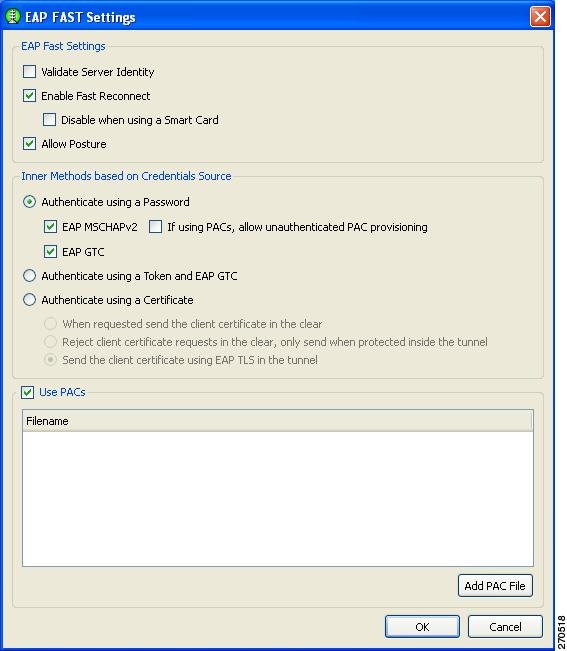
This window contains three sections:
•EAP Fast Settings
–Validate Server Identity—enables server certificate validation.
–Enable Fast Reconnect—enables session resumption.
Note The Disable when using a Smart Card and the Authenticate using a Token and EAP GTC options are not available for machine authentication.
–Allow Posture—The term posture refers to a collection of attributes that can be use to identify the status of the endpoint device that is seeking access to the network. Some of these attributes relate to the endpoint device type and operating system; other attributes support various security applications that might be present on the endpoint, such as antivirus (AV) scanning software.
Validating or assessing posture applies to a set of rules for the posture data to assess the level of trust that can be placed in that endpoint. The assessment, or posture token, can be used as one of the conditions for authorizing network access. Posture validation, together with the traditional user authentication, provide a complete security assessment of the endpoint device and the user.
Note Allow Posture is not supported in SSC for Windows XP and Windows 2000 environments. SSC only supports this option in the Windows Vista environment.
•Inner methods based on Credentials Source—Enables you to authenticate using a password, certificate, token, or EAP GTC.
Note Prior to choosing EAP MSCHAPv2 or EAP GTC, the option needs to be enabled on the Authentication Policy window (see the "Configuring Authentication Policy" section).
•Use PACs—Specifies the use of PACs for EAP-FAST authentication.
Note Typically, the Use PACs option must be checked because most authentication servers use PACS for EAP FAST. Before unchecking this option, verify that your authentication server does not use PACs for EAP FAST; otherwise, the clients authentication attempts will be unsuccessful.
On this window, you can manually provide one or more specific PAC files or authentication by clicking Add PAC File.
When you complete your selections and click OK, the Machine or User Authentication (EAP) Method window reappears (see the "Configuring EAP Authentication" section).
Configuring Trusted Server Validation Rules
When the Validate Server Identity option is configured for the EAP method, the Machine Server Validation window enables you to configure certificate trusted server rules (Figure 2-20).
Figure 2-20 Certificate Trusted Server Validation Rules Window
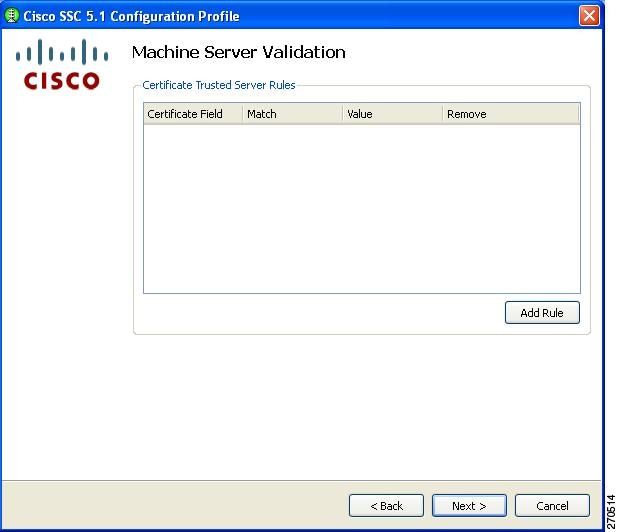
To define server validation rules, follow these steps:
a. Click Add Rule.
b. When the optional settings appear for the Certificate Field and the Match columns, click the drop-down arrows and highlight the desired settings.
c. Enter a value in the Value field.
Note Click Remove to remove the rule.
When finished, click Next and Figure 2-21 appears.
Configuring Trusted Certificate Authority
The Trusted Certificate Authority window enables you to configure authority options.
Figure 2-21 Trusted Certificate Authority Window
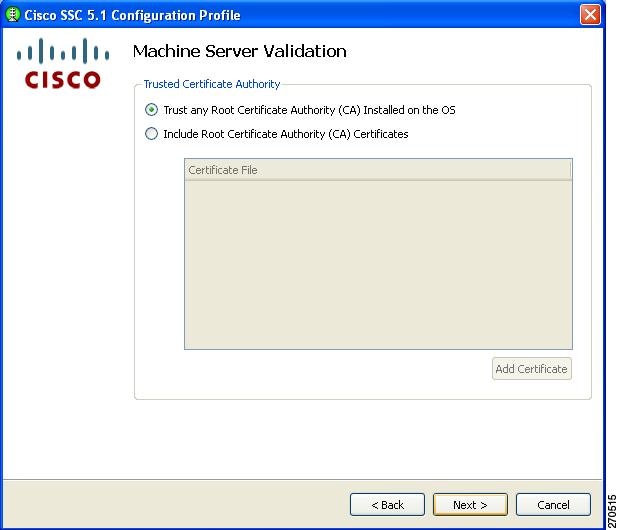
When you check the Include Root Certificate Authority (CA) Certificate option, you must click Add Certificate to add a certificate file.
When you are finished, click Next. The Machine Credentials window appears (Figure 2-22).
Configuring Machine Credentials
The Machine Credentials window enables you to specify the machine credentials (Figure 2-22).
Figure 2-22 Machine Credentials Window
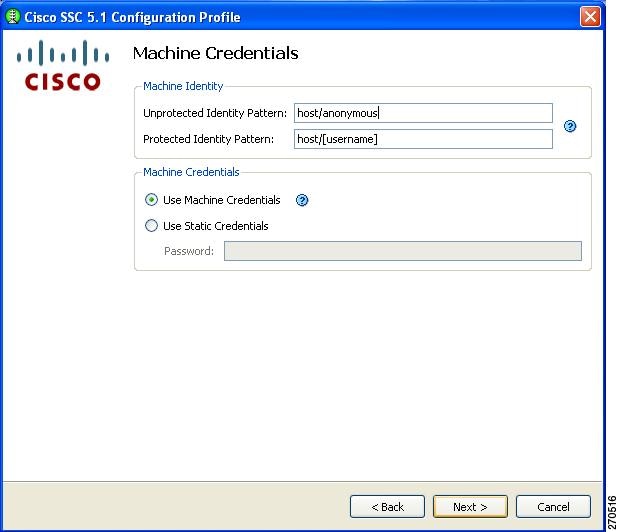
Note The Protected Identity Pattern option is not available when the EAP-TLS authentication method is chosen.
SSC releases 5.0 and later support these placeholder patterns when you specify identities:
•[username]—Specifies the username.
•[domain]—Specifies the domain of the user's PC.
When the [username] and [domain] placeholders are used, one of these conditions applies:
•If a client certificate is used for authentication, the placeholder's value is obtained from the CN field of the client certificate.
•If a client certificate is not used for authentication, the credentials are obtained from the operating system and the [username] placeholder represents the assigned machine name.
A typical pattern for machine unprotected identity is host/anonymous.[domain].
–If password source is configured for this profile, the pattern would be the actual string to send as the username with no placeholders.
A typical pattern for machine protected identity is host/[username].[domain].
–If password source is configured for this profile, the pattern would be the actual string to send as the username.
When finished, click Finish and the Networks window reappears (Figure 2-7).
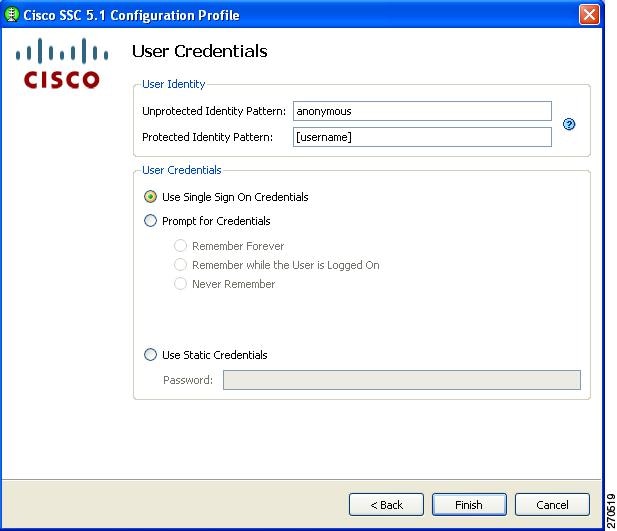
Configuring User Credentials
When you have configured a user connection, the User Credentials window enables you to configure the user credentials (Figure 2-23).
Figure 2-23 User Credentials Window
Note The Protected Identity Pattern option is not available when the EAP-TLS authentication method is chosen.
SSC releases 5.0 and later support these placeholder patterns when you specify user identities:
•[username]—Specifies the username.
•[domain]—Specifies the domain of the user's PC.
When the [username] and [domain] placeholders are used, these conditions apply:
•If a client certificate is used for authentication, the placeholder's value is obtained from the CN field of the client certificate.
–If the credential source is the end user, the placeholder's value is obtained from the information the user enters.
– If the credentials are obtained from the operating system, the placeholder's value is obtained from the logon information.
A typical pattern for user unprotected identity is anonymous@[domain] for tunneled methods or [username]@[domain] for non-tunneled methods.
If a client certificate is not used, the user identity pattern would be the actual string to send as the username (no placeholders). A typical pattern for user protected identity is [username]@[domain].
If the password source is this profile, the pattern would be the actual string to send as the password (no placeholders).
You can specify the user credentials by choosing to use single signon credentials (SSC obtains the credentials from the operating system), prompting the user for credentials, or specifying an actual static password credential to be sent in the deployment file.
When finished, click Finish and the window in Figure 2-7 reappears with the group and network configurations you have specified. When you click Next, the Validation window appears.
Validating the Configuration File
At this point, the management utility validates the networks you have defined against your policy settings. Any policy violations are displayed. You must correct any errors before you save the file. For example, errors might appear in the Validation window (Figure 2-24).
Figure 2-24 Validation Window with Validation Errors

When there are no validation errors, you can save the deployment file in any location you choose or accept the default location. The processed file (signed with encrypted credentials, PACs, and CA certificates) is stored by default in this file location:
C:\Documents and Settings\All Users\Application Data\Cisco\Cisco Secure ServicesClient
\newConfigFiles\configuration.xml
\newConfigFiles\configuration.xml
The Cisco SSC client looks in this location for any new destination package. If you have the client installed on your system, you can automatically test and verify the configuration that you just created before deploying it.
Click Finish to save the configuration file.
If you need to make changes to the deployment package you just created, you can reopen the management utility, click Modify Existing Configuration on the welcome window (Figure 2-1), and choose the configuration file that you just saved.
Creating the Pre-Configured Client Destination Package File
The sscManagement Utility can be used to create the client destination packages with network administrator configured profiles.
Note For SSC 5.0, the sscPackageGen utility must be used to generate the destination package file.
Using the Management Utility GUI
To create a pre-configured client package, the administrator clicks the Create Pre-Configured Client Package button on the management utility GUI window (Figure 2-25).
Figure 2-25 Select Pre-Configured Client Components Window
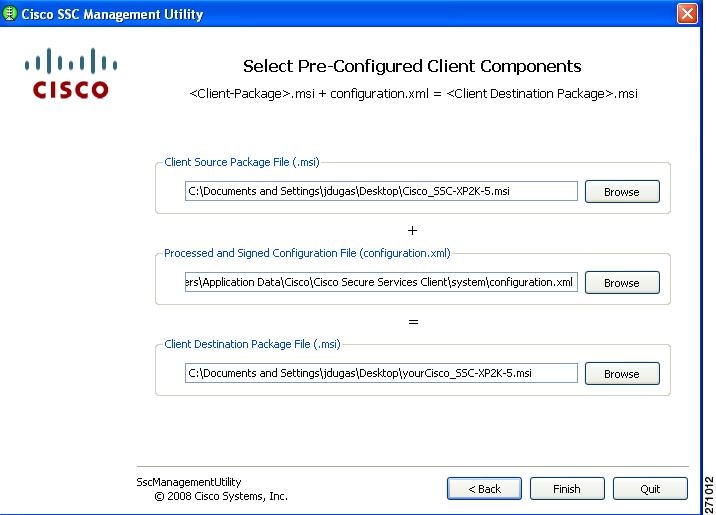
The management utility combines the client source package file (Cisco_SSC-SP2K-5.msi) with the processed and signed configuration file (configuration.xml) to produce the final client destination package file (yourCisco_SSC-XP2K-5.msi).
Accept the default file locations or click Browse to locate the files. Click Finish.
You can distribute the pre-configured client destination file (yourCisco_SSC-SP2K-5.msi) to the desired user PCs using your preferred distribution methods.
Groups in SSC
A group, fundamentally, is a collection of configured connections (networks). Every configured connection must belong to some group or be defined under the globalNetworks section in the distribution package.
Note End users can add networks only to groups and not to the globalNetworks section (because they typically do not have access to the management tool that would allow them to sign the distribution package).
Classifying connections into groups provides multiple benefits:
•Improved user experience when attempting to make a connection. It is important to understand how the client establishes a network connection in order to illustrate this point. The client works through the list of available networks in the order in which they are defined until a successful connection is made.
For example, an enterprise end user who often travels outside the business campus might configure connections for public WiFi networks or hotspots. Without groups, a newly configured home network is added to the end of this list, which could be quite large. The client works through the list from the beginning, including all the public networks, before establishing a connection to the home network. This greatly increases the time to get connected to the last added network.
•Easier management of configured connections. In the previous example, an end user might attempt to delete some connections to connect more quickly, but the deleted connections might be needed at a later time. However, if the connection list is divided into groups, each group list would be much smaller. It is easy to switch between the groups to obtain faster connectivity.
A group may be created by an administrator or an end user. At least one group must be defined in the configuration. If there are multiple groups, one group must be chosen as the active group. The client attempts to make a network connection using the connections defined in the active group. End users can add or delete networks only from the active group. Groups can be added or deleted by clicking on the Configure Groups button on the main window of the client GUI.
Networks that are defined in the globalNetworks section of the distribution package are available in every group at the top of the list. Because only enterprise administrators can create globalNetworks, administrators can control the enterprise networks that an end user can connect to, even in the presence of user-defined networks. An end user cannot delete administrator-configured networks.
It is important to note that a typical end user of an enterprise network does not need knowledge of groups in order to use this client. It is the responsibility of the administrator to always specify a default group in the created distribution package. If there is just one group available, the client selects that as the active group. The end user can add or delete their own networks without using groups.
Note A group selection is not maintained during reboots or SSC repairs. When SSC is repaired or restarted, SSC always goes back to the first configured group in the configuration.xml file.
VPN Integration
SSC 5.1 integrates an automatic VPN connection feature but requires the Cisco IPSec VPN client (4.8 or later) to be installed on the user's PC. SSC minimizes user intervention when establishing a VPN connection. SSC supports these IPSec VPN authentication options:
•Password—Specifies a simple password authentication.
•Secure Computing SofToken II—Specifies a soft token from Secure Computing SofToken II for authentication. This option requires that Secure Computing SofToken II be installed on the user's PC. SSC uses the Secure Computing SofToken II APIs to get a password that is automatically passed to the VPN daemon as a credential.
•Certificate—Specifies certificate authentication and uses the connection to specify the certificate to use. Using this option, SSC does not prompt the end user for anything.
If the VPN concentrator does not require user authentication, such as in group authentication, SSC does not prompt the user for information.
When authentication is required by the VPN concentrator, SSC prompts the user for VPN logon information:
•Soft token authentication—Prompts for username and pin for the soft token account.
•Password authentication—Prompts for username and password.
•Certificate authentication—No prompt is required.
When the VPN connection is successful, SSC maintains the user-entered information for possible future VPN connection attempts while the user is logged on to the PC. If the VPN connection fails, SSC re-prompts the user for VPN logon information.
SSC deletes the user's VPN information when the user logs off, shuts down the PC, or repairs SSC.
Supported VPN Features
SSC supports these VPN features:
•A single set of credentials for VPN access through all networks and VPN connections, which is maintained until the user logs off or the service is restarted (repair or reboot).
•Each individual profile has a setting to enable or disable automatic VPN connection and a choice of the VPN connection entry.
•An edit networks option is provided to allow the user to change the automatic VPN connection setting.
•SSC loads the .dll files for IPSec VPN and Secure Computing SofToken. If the .dll files cannot be loaded the VPN feature is disabled.
•SSC provides a new icon to indicate the VPN connection status.
–Right clicking the tray icon provides options to Connect VPN or Disconnect VPN.
•Prompt for soft token credentials.
Unsupported VPN Features
SSC does not support these VPN features:
•Use of static credentials in the schema as soft token credentials.
•Use of single sign-on credentials in the schema as soft token credentials.
•Use of hardware tokens.
•Changing the password for the soft tokens from Secure Computing SofToken II.
Nessun commento:
Posta un commento